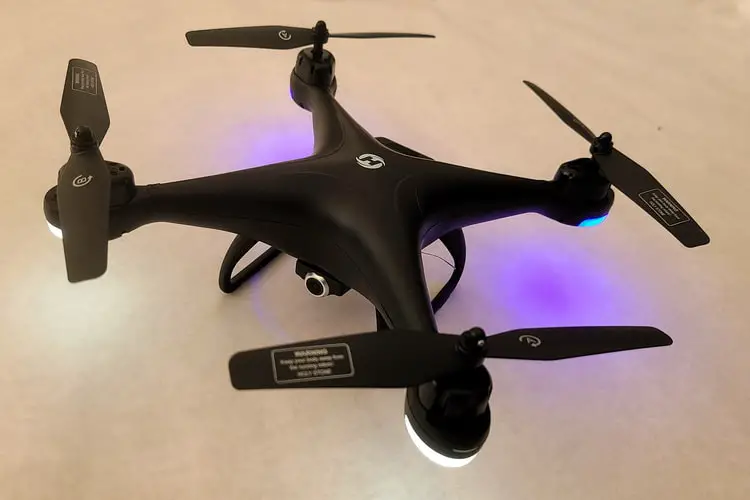
Holy Stone is capable of producing a decent quality beginner’s drone at a reasonable price, and the HS110D (which you can buy here) could be another option to consider if you’re looking for your first drone. We took it out for a test flight to see if this is the drone to get you up in the air or if you should just let it fly right past you.
Our Score for the Holy Stone HS110D Drone
 Learn More |
Overall Expert Rating What we like: |
|---|---|
| Getting Started | |
| Batteries | |
| Features | |
| Ease of Use | |
| Value for Money |
All Photos Credit: Richard J. Bartlett
About the Holy Stone HS110D Drone
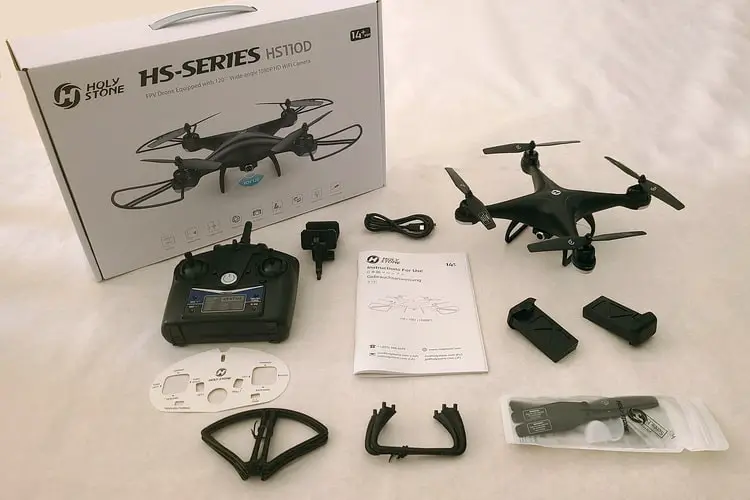
Packaging & Accessories
It’s a pretty standard box for Holy Stone, with the front of the packaging featuring a neat, black and white design that’s fairly minimalistic. However, unlike other drones from the same company, there’s a number of images with accompanying text to highlight the different features of the drone and controller.
It’s a medium-sized box that measures 16.5 x 11.0 x 4.0 inches and weighs two and a half pounds. It opens from the bottom and there’s a plastic handle poking through at the top, so if you want to also use it as a carry-case, you’ll need to make sure the bottom is taped. If you don’t, you might find the box opening and everything falling out!
Inside the box you’ll find:
- 1 x Drone
- 1 x Controller
- 2 x Drone battery
- 1 x USB charging cable
- 4 x Replacement propellers
- 2 x Replacement propeller guards
- 2 x Replacement landing skids
- 2 x Replacement propeller light covers
- 1 x Cell phone holder
- 1 x Mini crosshead screwdriver
- Replacement propeller screws
- Instruction booklet
Everything is fitted into molded plastic, with a clear plastic cover on top to help keep the contents in place. The box itself is made of relatively thin cardboard, but should still be sturdy enough to protect the drone and accessories inside.
Assembly and Getting Started
If you’ve got kids who are anxious to see the HS110D in action, you’ll be relieved to hear there’s very little assembly required, and if you’ve used a drone before, you can be up ‘n running (or flying, as the case may be) within just a few minutes.
At 81 pages, the instruction manual is a little hefty, but there are three languages included, and again, if you’ve used drones before you probably won’t need to read it to get started (just be sure to read it later!).
For example, there are 6 pages of the obligatory (and sometimes required) information before we come to an overview of the controller and drone features and functions.
The good news is that the layout of the controller is pretty standard and the buttons are fairly self-explanatory (although you’ll probably need to review the trim controls).
The landing skids are already attached, and both batteries are already charged (at least to some extent) and one of the batteries is already inserted. Incidentally, be sure to have 4 AA batteries for the controller; otherwise, the drone won’t be flying anywhere.
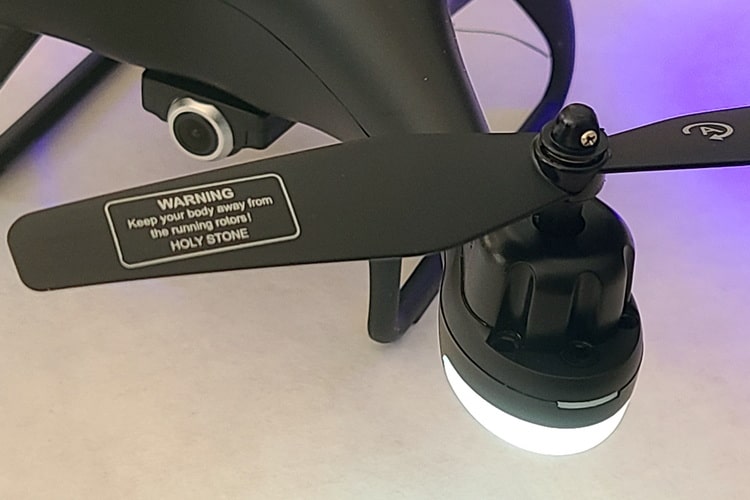
This only leaves the propeller guards to be attached, which is done by clipping them to the motor base, just below the propeller. This was a little fiddly, but the guards felt reasonably secure once they were attached. However, they’re not screwed in and they might become detached if the drone hits a solid obstacle.
After powering on both the controller and the drone, you can pair them by pushing the left joystick up and down until the lights on the drone blink slowly. You’ll also need to calibrate the gyros, which is done by simply pushing the RE-SYNC button on the controller for a few seconds.
At this point, you should be pretty much ready to go.
In terms of the manual, you will, of course, find instructions on how to do all of the above, plus directions on how to perform the following:
- Charge the drone battery
- Install/replace the propellers
- Install the landing gear
- Remove the camera
- Attach the cell phone holder to the controller
- Insert the battery into the drone
It’s important to note that you can only charge the battery while it’s attached to the drone, which frankly makes no sense. There’s a USB cable included in the package and this can be plugged into the drone for charging, but there’s no way to plug the cable directly into the battery,
There’s also no charger included, so you’ll need to either use your own or plug it into a power strip that has USB outlets.
It’s a very inconvenient way to charge the battery, for two important reasons:
- If you’re using a power strip it’s most likely going to be on the floor, which means you’ll probably need to leave the drone on the floor too, making it potentially susceptible to accidental damage
- More importantly, since there’s no way to plug more than one battery into the drone, you can only charge one battery at a time, and with the charge time being about an hour, that could mean a two-hour wait. (Not to mention you’ll have to remember to switch the batteries once the first has finished charging.)
You’ll also find instructions on how to fly the drone with the controller in the manual, and although there’s a QR code to download the app and connect via Wi-Fi, there’s no explanation as to which functions are available or how to operate the drone with the app.
Quality and Durability
Both the controller and the drone feel very lightweight and, as a result, somewhat fragile. Neither seemed as though they could survive being accidentally dropped.
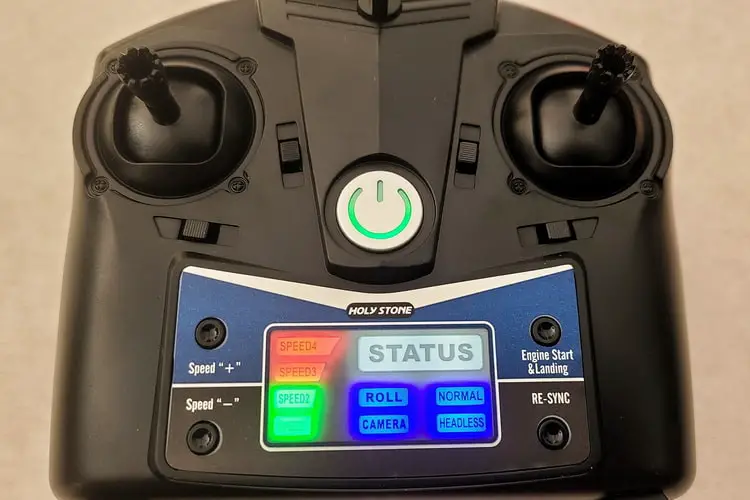
That said, the controller is a decent size and comes with a card overlay to help you identify the various controls. For the most part, it functions in much the same way as other controllers, but there are a number of key differences.
For starters, many controllers allow you to change the drone’s speed by pushing a button at the front, but that’s not the case here. Instead, we have two small buttons to the left of the status screen – one to increase the speed and one to decrease it. Again, this is different from many other controllers in that the drone’s speed is usually adjusted by cycling through the available speeds, which forces the drone to go faster before it can go slower.
In this respect, having two buttons is better, as it can make it easier to maintain control.
Similarly, there’s a RE-SYNC button, which is used to calibrate the drone’s gyro. Many other controllers perform this same task by having both joysticks moved diagonally at the same time.
Realistically, this shouldn’t cause too much of a problem, but if you’re used to changing the speed by tapping a button and calibrating the gyros by moving the joysticks, then you might find it a bit of a mental adjustment.
Trim controls are different too. On many controllers, you can trim a drone’s drift by pushing a button and then moving the joysticks in the desired direction. However, in this case, there’s one button to trim forward/backward movement and a second for left/right movement. In order to trim the drift, you need to move the associated button in the required direction. In other words, if you need to trim in both directions, you’ll need to push both buttons
It’s also worth knowing that the “Engine Start & Landing” button will only start the engine and land the drone; the drone won’t automatically take off if the drone is already on the ground.
Besides this, the joysticks move smoothly in all directions and the cell phone holder is better than most. There’s a small screw that allows you to secure the cell phone holder in place, and the holder can be tilted without becoming loose.
One thing that seems a little gimmicky is the controller display. The lights will indicate its speed and current function (eg headless mode), but frankly, it just seems totally unnecessary. Unless you’re not sure of which speed mode you’re using or if you have something like headless mode activated, you’re won’t be looking at the controller anyway.
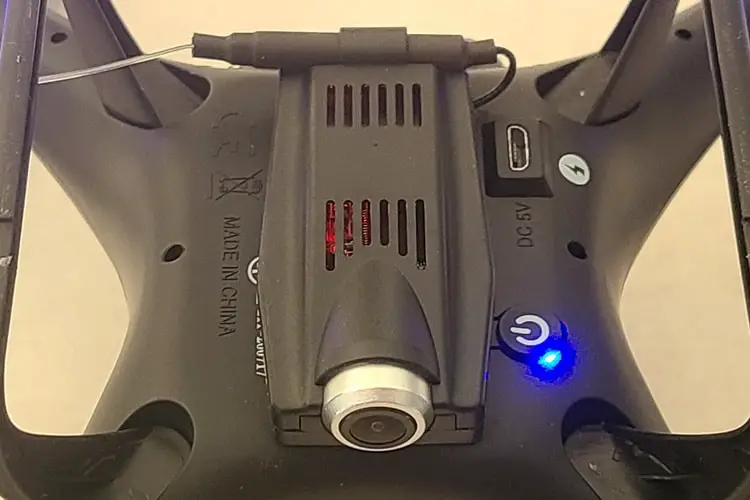
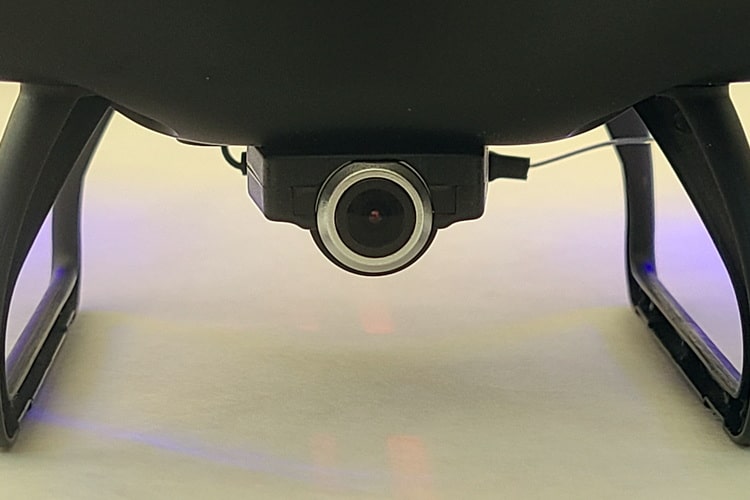
There’s a micro SD card slot at the back of the drone, and while the specifications state the recording quality if images and video are stored on a TF card, it makes no mention of where or how to insert the card into the drone. This could be confusing for anyone unfamiliar with drones and how they work.
The camera itself is detachable, which makes it easier to insert a micro SD card, but otherwise, there seems to be little reason to remove it. If you do need to remove it, this is easily done by sliding it forward, and the camera can be reinstalled by mounting it into the four camera slots and then sliding it backward.
The camera can’t be moved and can therefore only shoot video (or take pictures) facing directly forward (see below.)
Performance and Ease of Use
As this drone is very lightweight, you’ll probably find it a little tricky to fly it with even a slight breeze. It was tested on a warm, clear day with still air but an occasional breeze of about 3mph, and although the drone was able to fly at low altitude without too many problems, it drifted a lot. That being the case, it was difficult to correct the drift while still trying to maintain control of the drone.
The reality is that the drone can be very easily blown off course and difficult for the operator to compensate for the breeze and attempt to bring the drone back. There’s no Return to Home button either (although it’s debatable as to whether this would be effective).
Features & Functions
The functions listed below can be performed through either the controller or the app (although you’ll probably find it easier to fly the drone with your controller rather than your cell phone).
- Pairing and Calibration: This appeared to work without any problems; however, if the drone crashes you’ll need to power the controller off and then on again in order for it to pair again with the drone.
- One Key Take-Off and Landing: There’s no auto-takeoff function on this drone. Pushing the Engine Start & Landing button will only start and stop the rotors and you’ll then have to move the joystick up in order for the drone to lift off the ground. The landing function worked well; the drone descended slowly and landed gently, but if the drone is anything like 50 feet off the ground, it could take a little while to land. That’s something to bear in mind if the drone starts to drift away from you.
- Emergency Stop: As with many other drones, this is accomplished by pushing both front buttons simultaneously and causes the engines on the drone to immediately stop. The drone will then drop from its current altitude and hit the ground. Obviously, this should not be done unless there’s simply no other option as it could cause damage to the drone. Performing this function at a low altitude (roughly three feet) caused the camera to fall from the underside and for one of the propeller guards to drop off. (The camera was not damaged.)
- Trim: As noted, due to its lightweight construction, the drone drifts a lot, and correcting the drift with two separate buttons is awkward. As a result, the drone can easily drift away from you, even with just a slight breeze.
- Flips/Stunts: The drone can perform flips by pushing the right front button and then pushing the right joystick in the desired direction. This might be fun at first (especially for kids) but otherwise, it’s not much more than a gimmick.
- Headless Mode: As always, this is a great feature for a beginner. The problem here is that the drone drifts so much that it makes headless mode somewhat problematic.
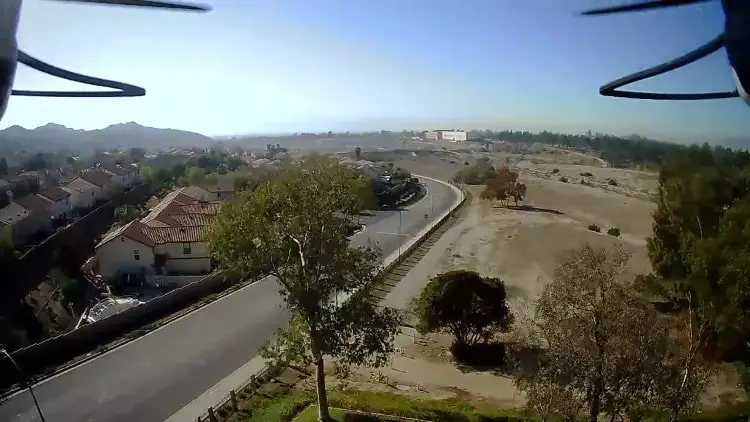
- Photos and Videos: There was no problem capturing images and shooting video via the wifi app. Images are stored as JPEGs at a resolution of 1920 x 1080, while videos are MP4 at a resolution of 1280 x 720. If the video is stored on an onboard micro SD card, the resolution is 1920 x 1080. Generally speaking, both were of good quality, but you’ll see from the examples here (see above and below) that the propeller and guards are always in-frame. Since there’s no way to adjust the angle of the camera, there doesn’t appear to be a way around this. Also, as the drone is easily buffeted by the breeze, you may need to take several photos and the video may be shaky. (The video below was shot in a handball court to minimize disruption from the slight breeze.)
- Altitude Hold / Hover: This worked reasonably well once the drone’s drift had been trimmed.
The following features and functions can be performed exclusively through the app and are better suited to advanced users:
- Gesture Mode: This feature allows you to control the drone with hand gestures
- Voice Commands: You can have the drone perform some basic functions (such as takeoff and land) with voice commands.
- VR Mode: If you have a VR headset, you can enjoy an immersive birds-eye view of the surroundings via the camera on the drone. (It’s probably best if someone else flies the drone with the controller at that time, as it might be difficult to operate the drone at the same time.)
There are no Waypoint, Points of Interest or Follow Me modes available with this model.
Target Audience
Being on the lower end of the price range, the HS110D (which you can buy here) is clearly meant for beginners on a budget. It has many of the standard features you’d expect from a drone (for example, Headless Mode) and comes pretty much ready-to-fly right out of the box. Families as a whole can enjoy it, but younger children will find it very difficult to control.
Specifications & Features
Specifications:
- Weight: 0.3 pounds
- Flight time per battery: 10 mins
- Number of batteries supplied: 2
- Battery charge time: 1 Hour
- Total flight time, out of the box: 20 mins
- Maximum range: 492 feet (150 meters)
- Maximum height: 394 feet (120 meters)
Features:
- Headless mode: Yes
- Manual return: No
- Smartphone FPV: Yes
- Auto Return: No
- One key takeoff/land: Yes
- Altitude hold: Yes
- Point of interest/custom mode: No
- Obstacle avoidance: No
- Stunts: Yes
- Colored LED Lights: Yes
- GPS Enabled: No
- Follow Me mode: No
What We Liked
- Decent flight time
- High res images and video
- Very little assembly required
- Budget-friendly
What We Didn’t Like
- No way to charge the batteries separately
- There was a lot of drift
- Trimming was awkward
- Easily blown by a light breeze
Final Verdict
The HS110D (available here) promises a lot, and at first glance, it seems quite capable of delivering on those promises. Unfortunately, its lightweight construction and tendency to drift make this a difficult drone to fly and could prove to be discouraging for beginners. It’s also a little large to be flown indoors (or at least, not without the risk of something breaking!) leaving you with restricted as to when and where it can be flown.
If you’re looking for more information about drones, we’ve created a series of guides to the different drones available. You can check out our overviews of the best small drones for kids and the top drones under $200.
Additionally, we have a series of in-depth product reviews of specific drones, including our review of: the Holy Stone HS165 foldable drones review, Eachine E520 Foldable Drones Review, Potensic d80 drones reviews, Tomzon a31 flying pig mini drones review, Snaptain s5c drones review, Holy Stone hs340 mini drones review, Holy Stone hs210 mini drones review, Holy Stone hs120d drones review, Holy Stone f181w drones review, and our DEERC UFO mini drones review. Each of these guides will walk you through the different features, instructions, pricing, and pros and cons for each drone to help you find the best one for you.
Born in England, Richard J. Bartlett has had a passion for astronomy since the age of six. Besides being featured in Sky & Telescope magazine and previously having his own monthly column in Astronomy magazine, he’s written and published a number of books (US Amazon and UK Amazon) including several for Orion Telescopes. Now residing in southern California, Richard never misses an opportunity to stare at the stars.